WikiHow is a wiki, which means that many of our articles are written by multiple authors. When creating this article, 24 people worked on editing and improving it, including anonymously.
Have you seen very realistic, high-contrast photos? Are you wondering how to make the same? The matrix of a digital camera is unable to simultaneously record information in both dark areas of the image and light ones. Some part of the image will be overexposed (details such as clouds will be lost as a result), some will be underexposed. This is due to the low dynamic range of the matrix. However, by taking three different shots, combining them into a high dynamic range (HDR) image and applying digital processing, you can create a photo that fully captures the beauty and details of the scene in the frame.
Steps
Taking photos
-
Download and install the program. There is another software to create HDR, but Luminance HDR is free and works on many platforms like Windows, Linux and Mac OS.
Close all running programs before starting the process. Tone mapping creates a serious load on the processor and the computer can "slow down".
Launch Luminance HDR and click "Create HDR Snapshot". In the window that appears, click "Next", then click the green plus sign to add 3 photos you have taken. Luminance HDR reads exposure values from EXIF data. Sometimes, for example, if you used an old DSLR lens through an adapter, the shutter speed will have to be entered manually. Then click "Next".
Skip the next window too. The parameters you set affect the final result, but the default values work very well. Click To complete. You have a high dynamic range image, but it cannot be displayed in a low dynamic range format (such as the familiar JPEG format). This is where tone mapping comes in: by compressing the dynamic range of the image you've created, it allows you to display a higher dynamic range in a 24-bit image.
Perform compression. In the tone mapping window, you will see a set of parameters and compression algorithms. In most cases, the Mantiuk algorithm (the first one on the list) works quite well. If you wish, you can experiment with other algorithms and settings. Click the "Tonemap" button to complete the process.
Choose a story. HDR is great at bringing out details in almost any scene, so take your pick. If nothing comes to mind that others shoot in HDR. If there are still no ideas, choose a landscape with clouds - clouds in HDR come out especially effectively.
If the camera (or, worse, an object in the frame, as in this case) will move, the image will "split" and look lousy. Fix the camera! Install the camera. Mount the camera on a tripod if you have one, or place the camera on a stable surface. If you have a camera remote control, so much the better, if not, use a timer. The main goal is to ensure that the camera position does not change between shots. If your camera has an automatic bracketing (bracketing) function, use it (in Canon cameras this function is called AEB). Setting the bracket to +/- two stops is usually enough to produce good HDR for most scenes.
Take photos. If you've set your auto bracketing settings, just take 3 shots in a row. If you do not have the bracketing function, we take several shots by varying the shutter speed. For example, you can start with a fairly slow shutter speed (1/250 sec, 1/125, or 1/60 sec) and gradually decrease its value (1/500 or 1/1000). As a result, you will get 3 shots: normal, overexposed and underexposed.
Copy the resulting photos to your computer. Now let's work on correcting and creating an HDR image from the three photos you took.
HDR Creation and Tone Mapping
The capabilities of the HDR format allow you to effortlessly turn ordinary pictures into real photo masterpieces. We will tell you how to take HDR photos, introduce you to some techniques for working with such images, and select the best software.
If we consider the passion for photography as a desire to join the art, and not just keeping a diary of travels and events, then it makes sense to look at a fairly new direction in this area - HDR (High Dynamic Range - wide, or high, dynamic range). Photographs taken using special shooting and post-processing techniques not only show much more detail and tones than usual, but they often look so unusual that they make the captured scene feel unreal. It is for this reason that professional photographers consider this way of post-processing images to be "fiction" because of the "unnatural" image obtained. However, in some difficult shooting conditions, it is indispensable to “pull out” details from a different range of lighting. As already mentioned, HDR photography is a special art, and we will explain how to achieve excellent results with the help of professional tools.
See also the article "Fantastic shots in difficult conditions"
HDR photography: the theory of relativity
The world is very diverse, and our senses are not able to fully perceive all the matter that exists in it. For example, we see poorly in the dark and have difficulty distinguishing objects that are in the backlight. So, admiring the setting sun on the sea, we see only the dark silhouette of a sailboat next to it, because in this case our eye is tuned to a certain “visible range” - a limited level of sensitivity in order to save the retina. However, I would like to see the whole picture - and this is possible.
The range of perception of the human eye is much wider than that of a camera. But if you shoot with different parameters, then it can be significantly expanded. In photographic equipment, the sensitivity range is even less wide than that of the human eye, but it can be used to shoot one scene with different settings and thus artificially expand the boundaries of the perception of illumination. This is the essence of HDR technology. It combines several visibility ranges in one image at once and displays all objects on it - both those that were in the shade and those that could not be seen in the backlight (against the bright sun).
Files of this format are called HDRI (High Dynamic Range Images). They store much more information about the range of brightness than graphic files with the extensions JPEG, BMP, etc. After a brief theoretical acquaintance with them, it is worth talking about the practical benefits that can be derived from the HDR format and the directions in which it has meaning to apply. There are two options - classic (use the HDR technique to get more detailed images taken in difficult conditions) and fantastic (create amazing landscapes and scenes with unrealistic lighting and rich color tones).
Mission HDR
The developers of three-dimensional computer graphics were the first to adopt high dynamic range imaging technology. The virtual space in which volumetric objects are rendered is devoid of surroundings, so all materials that reflect or refract light to a greater or lesser extent look unnatural. To overcome this shortcoming, 3D animators use a "fake" environment based on the use of HDRI. Such a picture makes it possible to more realistically transfer information about the distribution of the light flux into a three-dimensional scene.
Another practical application of this technology is image exposure correction. Most novice photographers mistakenly assume that the key to a well-taken photo, in addition to good composition, is the right shooting parameters (focus, the right ISO value and shutter speed). In fact this is not true. Sometimes shooting conditions can be so difficult that no settings will allow you to get the best result. A great example of "elusive settings" is shooting against the light. It is extremely difficult to find a golden mean in camera parameters. If you take the average shutter speed, the image will most likely still need additional editing - brightening dark areas and darkening excessively bright parts of the photo.

The HDR function allows you to take great shots in difficult conditions. This feature is so in demand that it was even built into the iPhone 4. The ideal solution to this problem is the use of HDR technology. Most modern cameras do not yet have a built-in function for automatic processing of such images. However, the process of obtaining composite images is simple: for this, the bracketing shooting function is used - taking a series of three frames with different exposures. Since it is almost impossible to get a picture of this format in hardware, you can create a similar picture using a sequence of images taken with different shutter speeds. However, we note that devices and even smartphones, such as the iPhone 4, have already begun to enter the market, capable of automatically taking a series of pictures with different parameters and eventually producing a single, already processed frame.
How do I take an HDR photo and how many shots do I need to take to merge into an HDR image? There must be three or more. The more photos with different exposures you take to compose an HDR picture, the wider the dynamic range you will get, which means that you can control the color reproduction more flexibly at the stage of setting the final image. The absence of a component frame with a certain shutter speed will mean the loss of a certain section of the dynamic range. Of course, to obtain the final image, an algorithm is used to approximate the nearest color values at each point in the image, but the accuracy of the illumination information in this case will be lower.
Creative tools
The simplicity and ease of use of HDR technology have led to the emergence of a large number of programs for working with images in this format. At the same time, any user has the opportunity to decide whether to use a complex photo editor that supports, among other things, working with the HDR format, or choose a separate utility for processing only such images, and then “finish” the result in some free app. In our opinion, the first option is preferable from the point of view of convenience and completeness of the toolkit. Therefore, today we will tell you how to make an HDR photo in Corel PaintShop Photo Pro X3, Photoshop and HDR Efex Pro.
Also on our disk you will find free and trial versions of specialized utilities that could become an alternative to expensive packages (see the "Everything to work with HDRI" section).
Combining pictures automatically
Corel PaintShop Photo Pro X3 Address in Internet: www.corel.com Recommended price: 3500 rub.
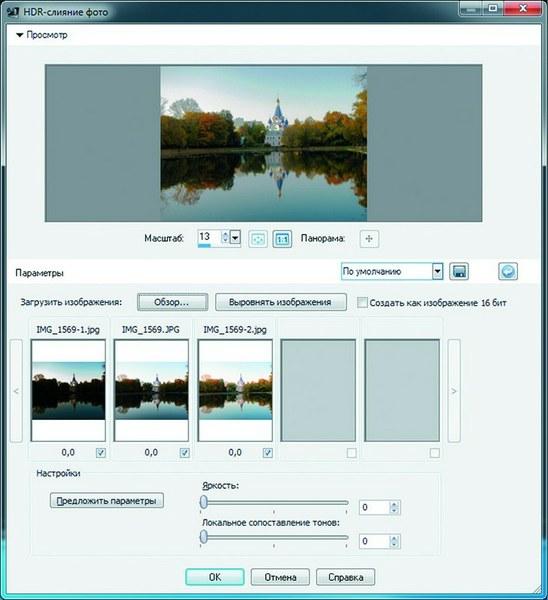
Corel PaintShop Photo Pro X3's automatic convergence allows you to quickly get pictures from series taken in difficult conditions Of all the programs we have chosen, the wide dynamic range image-based exposure correction method is most successfully performed in the semi-professional graphic photo editor Corel PaintShop Photo Pro X3. When compiling information about the illumination at a specific point in the picture, it is very important that the pictures are taken from a single point, with zero lens shift. In practice, this is quite difficult to do, especially if you do not have a tripod at your disposal. The HDR Photo Merge tool offers a fairly accurate method of image alignment, which allows you to compensate for perspective distortions caused by small differences in camera position when shooting different frames. To fix the exposure, you need to select the menu item "File | HDR photo fusion…”, and then specify the location of all photos with different exposures. If you are going to experiment with different series of photos, it is better to turn on the automatic selection option in the file selection window, which will make it easier to select the desired pictures. At the same time, the program will independently determine which frames should be selected by comparing the time of their creation, and then bring the selected photos together and show the result in the preview window. Most likely, it will be unsatisfactory, since the elements of the HDR image were not aligned with each other, and the brightness of the final image was not adjusted. To get closer to the ideal HDR effect, first of all, you need to click on the "Align" button - it will correct the discrepancy in the contours of objects in different pictures.
Since the main goal of exposure compensation is to convert the HDRI luminance range to the luminance range displayed by the monitor, a procedure called "Tone mapping" must be performed. The output will be a standard "narrow" dynamic range image that we are used to dealing with (JPEG, etc.). In the HDR Photo Merge settings, there are only two parameters that determine the final effect - the resulting image brightness and the level of "Local tone mapping". These indicators can be set manually or trust the automation by clicking the "Suggest parameters" button. In most cases, the graphic editor accurately determines the appropriate position of the settings sliders.
Processing methods and templates - to choose from
Adobe Photoshop CS Web address: www.adobe.com Recommended price: from 13 000 rub.
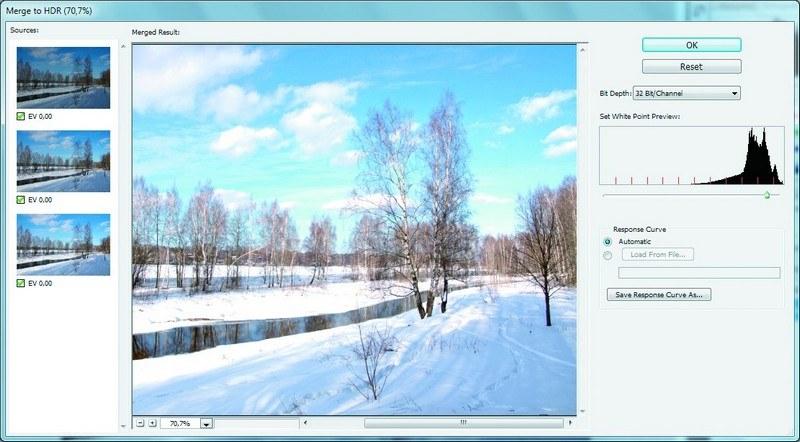
The "Merge to HDR" tool in Adobe Photoshop is quite easy to use, but it gives you the opportunity to save the result in HDR format Tools for working with HDRI are also available in the most popular professional graphics editor, Adobe Photoshop. Compared to the capabilities of PaintShop Photo Pro, Photoshop's Merge to HDR tool (accessed from the File | Automate menu) is more flexible. There are several methods available for converting the HDRI luminance range to the one displayed by the monitor, as well as a large number of settings for controlling hue, color saturation, edge glow and other image features. Indicators do not have to be selected manually - more than a dozen ready-made sets of parameters are already built into the program to obtain different versions of the effect. In addition, Photoshop allows you to save custom settings and transfer a set from one computer to another.
When working with the "Merge to HDR" tool, you can automatically remove objects from the output image that accidentally fell into the frame and are present in only one image from the sequence, for example, a bird flying by. In this case, the "Delete double" command will help.
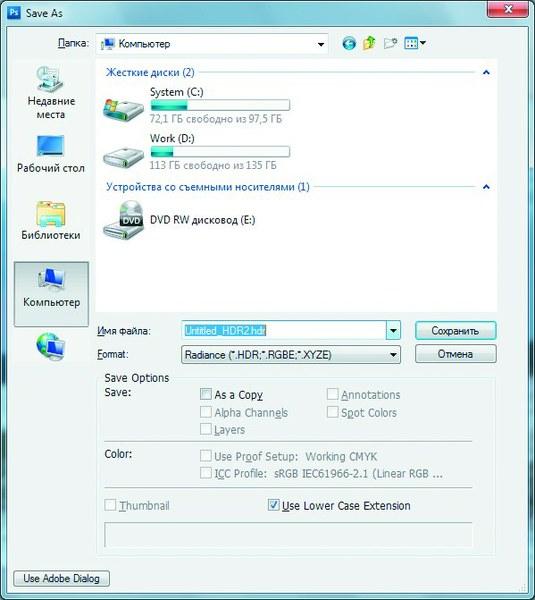
Another important difference with the HDR tool in Photoshop is the ability to save the result as an HDR file. To do this, in the "Merge to HDR ..." window, select a color depth of 32 bits. After that, when performing the standard procedure for saving files, HDR will appear among the available options.
Surrealism in photography
HDR Efex Pro Internet address: www.niksoftware.com Recommended price: from 5000 rub.

Changing the dynamic range locally allows you to create fantastically beautiful pictures from quite ordinary subjects Using HDR, the photographer can show his talent in creating surreal pictures that are very far from reality. For these purposes, it is convenient to use the HDR Efex Pro program, released by Nik Software. This application can only work as an add-on to Photoshop, Lightroom or Aperture. The main difference between HDR Efex Pro and other tools for creating HDR photos is that it not only allows you to fine-tune color rendering, but also gives you the ability to control it locally by separately adjusting the "Tone mapping" parameter in specified areas of the image. To do this, you need to use the so-called control points, which are indicated in the HDR Efex Pro preview window with special markers. By design, the use of control points is somewhat similar to the work of adjustment layers. Such a control point is placed in the center of the area to be processed. By clicking on the corresponding point marker, the user can adjust the parameters that determine the nature of the changes made to the photo. For example, you can specify the radius of the editable area, set the smoothness of its edge, light intensity, image contrast and brightness, hue, and other parameters. There can be as many control points as you like, and their position can be changed by moving them around the photo, like an adjustment layer. In order to see the radius of the area of influence of the control point, just click on it or try to change its position.
Another advantage of HDR Efex Pro is that the user can not waste his time experimenting with parameters, but can turn to a large library of HDR effects. All sorts of options for "Tone mapping" presets make it possible to get images with a wide variety of moods.
Everything to work with HDRI onchip DVD
In this collection you will find both free utilities and demo versions of the best programs for working with HDR images.
- Artizen HDR- a full-fledged graphic editor with functions HDR processing(TryBuy, about 1500 rubles, www.fhotoroom.com).
- EasyHDR- a convenient package for processing HDR images with a localized interface (trial, about 1700 rubles, www.easyhdr.com).
- picturenaut- a free program for working with HDR (www.picturenaut.com).
- Luminance HDR- utility with open source, which offers several processing algorithms (http://qtpfsgui.sourceforge.net).
- Dynamic Photo HDR- a specialized package for HDR (trial, about 1700 rubles, www.mediachance.com).
- Brennig's View- lightweight and functional viewer of graphic files, including HDR-format.
The cameras of the Pixel and Nexus smartphones have never been anything special, but over the past four years they have taken a powerful leap forward and now occupy the first lines of the ratings. Why did it happen? Because Google has implemented a software post-processing engine called HDR+. In this article, we will explain how it works and how to enable HDR+ on your smartphone, regardless of brand.
What is HDR
To fully understand how HDR+ works, you will first need to understand regular HDR.
The main problem of all smartphone cameras is the small size of the matrix (or rather, photocells) and, as a result, insufficient coverage of the dynamic range. To correct this drawback, the HDR (High-Dynamic Range) algorithm was developed, the principle of which is as follows: the camera takes a frame with a standard exposure level for a given scene, then takes an underexposed frame, on which only overexposed areas of the original image will be clearly visible, then An overexposed image in which only the dark details of the original image are visible, and everything else is overexposed. Further, the images are superimposed on each other and combined using special algorithms, the quality of which depends on the manufacturer of the camera software. The result is a picture with good detail in both the shadows and the brighter areas.
The disadvantages of HDR are obvious: a long shooting time leads to the fact that moving objects caught in the frame will double, and even a little shaking will blur the picture.
What is HDR+
Smart heads have come up with an algorithm devoid of the shortcomings of HDR. However, it has only one name in common with HDR.
HDR+ stands for High-Dynamic Range + Low Noise. He received his fame for a number of outstanding features: the algorithm is able to eliminate noise with virtually no loss of detail, improve the quality of color reproduction, which is extremely important when poor lighting and at the edges of the frame, along with this, it greatly expands the dynamic range of the photo. HDR +, unlike standard HDR, is almost not afraid of smartphone shaking and movement in the frame.
The first HDR+-enabled smartphone was the Nexus 5. Due to not the best white balance and a small aperture (f2.4), the camera of this smartphone was considered nothing more than a strong middling. Everything changed with the release of the Android 4.4.2 update. It was it that brought with it support for the HDR + mode and the amazing quality of night shots. Although they were not very bright across the entire field of the frame, thanks to HDR + they practically did not contain noise while maintaining small details and had excellent (for smartphones in 2013) color reproduction.
History of HDR+
How does a company that has never done a camera come up with an algorithm that works wonders using conventional, by flagship standards, Nexus and Pixel cameras?
It all started in 2011, when Sebastian Thrun, CEO of Google X (now just X), was looking for a camera for Google Glass augmented reality goggles. The weight and size requirements were very strict. The size of the camera matrix had to be even smaller than in smartphones, which would have an extremely bad effect on the dynamic range and would lead to a lot of noise in the photo.
There was only one way out - to try to improve the photo programmatically, using algorithms. This task was to be solved by Marc Levoy, a lecturer in the computer science department at Stanford University, an expert in the field of computational photography. He focused on software-based image capture and processing technology.
Mark formed a team known as Gcam, which began to study the Image Fusion method (fusion of images), based on combining a series of images into one frame. Photos processed using this method turned out to be brighter and sharper, with a small amount of noise. In 2013 technology debuted in Google Glass, and then, in the same year, renamed HDR +, appeared in the Nexus 5.

How HDR+ works
What about dynamic range expansion? As we already know, using a fast shutter speed saves us from overexposed areas. It remains only to remove the noise in the dark area using the previously described algorithm.
At the final stage, the resulting image is post-processed: the algorithm minimizes vignetting due to light hitting the matrix at an oblique angle, corrects chromatic aberration by replacing pixels at high-contrast edges with neighboring ones, increases green saturation, shifts blue and magenta hues towards cyan, enhances sharpness (sharping ) and performs a number of other steps to improve the quality of the photo.

Left photo from stock samsung cameras in HDR, and on the right is a photo created in Gcam in HDR +. It can be seen that the algorithm sacrificed the detail of the sky to draw objects on the ground.


© 2014 website
Any photographer regularly encounters situations where the range of brightness of the scene being shot exceeds the dynamic range of his camera, and it turns out to be impossible to capture lights and shadows within the same exposure. Even worse, high contrast is a natural and inherent feature of a number of the most photographically attractive scenes (such as most beautiful sunsets). In such conditions, it is permissible to resort to the once innovative, and now rather hackneyed technology. extended dynamic range or HDR(High Dynamic Range).
The principle of HDR is to combine two or more shots of the same scene taken at different exposures into a single image. The result is a photograph that faithfully reproduces details in both shadows and highlights, much like the human eye does.
Some photographers (especially beginners) are literally intoxicated with the possibilities of HDR and use it where it is necessary and where it is not necessary. Others are cool about HDR and try to get by with more traditional tricks. I myself do not disdain occasionally use HDR where appropriate, but I think that HDR should be perceived as an exotic condiment that should not be poured into every dish (especially handfuls). When used delicately and at the right time, HDR is a very useful and effective tool.
Methods for Acquiring HDR Images
There are several main approaches to obtaining HDR images:
- Using layers and masks in Adobe Photoshop;
- Using the Merge to HDR Pro tool in Adobe Photoshop;
- Use of specialized programs for HDR;
- Use of camera tools.
In this article, we will consider the first method in detail, i.e. using layers and masks in Adobe Photoshop, as the most simple, visual and manageable.
The Merge to HDR Pro tool produces extremely poor quality results and is therefore strongly discouraged.
Of the third-party programs for working with HDR, I can advise Photomatix Pro, but I myself prefer to use Photoshop out of habit and because I rarely turn to HDR at all, and for the sake of single shots I don’t want to introduce additional program. The quality of the HDR images obtained with Adobe Photoshop is quite decent, as you will soon see.
As for the HDR feature now being built into many digital cameras, it's more for entertainment than serious work, and you shouldn't expect much from it.
Shooting equipment and conditions
For HDR photography, you'll need a tripod and a digital camera with exposure control. Theoretically, you can do without a tripod, but when shooting handheld, it will be difficult for you to achieve perfect alignment of individual frames.
Specifically, in the example we are analyzing, I slightly increased the contrast and color saturation using an S-curve, removed a couple of dust particles in the sky, and selectively increased the sharpness of the foreground using unsharp masking (Unsharp Mask). Here's what I ended up with.
If you don’t specifically look closely, then you won’t say that you have HDR in front of you. It is to this effect that one should strive. I want the viewer to think, “What a beautiful sunset!” when looking at the photo, and not: “What a beautiful HDR!”. It is not necessary to turn a technique into the main subject of photography. Otherwise, you give people reason to doubt that the real thing is there.
About moderation
The main disease affecting the amateur photographer who has just learned the basics of HDR is the lack of a sense of proportion. When combining different exposures, you should not go too far, otherwise you risk getting the most unnatural bad taste with the most illogical tonal transitions, pronounced halos and distorted colors. All this is excusable if your goal is surrealism, and such abstractness allows you to break away from dull reality. It's another matter if you tend to take more or less realistic photography, but your camera's lack of dynamic range prevents you from capturing certain scenes with a single exposure. In the latter case, HDR serves precisely to achieve greater naturalness of the image, and the technique itself, which allows expanding the dynamic range, should remain behind the scenes, as it were. HDR requires taste and moderation from the photographer. For example, the interior of a room cannot be brighter than the landscape outside the window illuminated by the sun. HDR allows you to soften the contrast between them, but the overall tonal relationship should remain natural. In the same way, the silhouettes of trees against the sunset sky will always be darker than the sky itself, and you don’t have to go against nature just because you have the opportunity.
In my opinion, HDR photography is good when you can't immediately tell if it's HDR or not. And not so often this HDR of yours is needed. The author tries to resort to HDR only when it is difficult or impossible to get a photo in the usual way. Know the measure too.

Thank you for your attention!
Vasily A.
post scriptum
If the article turned out to be useful and informative for you, you can kindly support the project by contributing to its development. If you did not like the article, but you have thoughts on how to make it better, your criticism will be accepted with no less gratitude.
Do not forget that this article is subject to copyright. Reprinting and quoting are permissible provided there is a valid link to the original source, and the text used must not be distorted or modified in any way.
The modern art of photography is not only about capturing the beauty of the moment or capturing the subject from the best angle. Today, many photographers seek to improve their photos by passing them through various filters, as well as adding special effects. One of these effects will be discussed today. It is called High Dynamic Range (HDR for short) or high dynamic range.
A bit about technology
Many digital camera owners have heard about HDR technology, but not all of them understand how it works. So what exactly is HDR? The human eye is truly a marvel of technology. Unlike cameras, it easily adapts to changes in lighting up to 24 exposure levels, thanks to which we can equally well distinguish fine details in both dark and light backgrounds. The dynamic range of most digital cameras is much lower, it is difficult for them to adjust to the light, so they capture well only areas with a certain level illumination.
So, if we manage to capture a dark building well against a light sky, the latter often turns into a blurry whitish spot, and vice versa, if a light sky comes out well, the detail of the dark building is lost, and the section of the photo on which it is located turns out to be noisy. These flaws are especially visible in photographs taken with imperfect cameras. mobile phones. HDR technology is aimed at eliminating this shortcoming. When using the HDR mode, the camera takes a series of shots with different shutter speeds and exposures, while autofocus in the process of shooting alternately concentrates on areas with different levels of illumination and distance from the lens.
Having created several frames, the camera then programmatically combines them into one image that is rich and detailed in dark and light areas. This is the key difference between HDR shots and regular photos. How high quality the resulting image will be depends on the algorithm used. Less high-quality photos are obtained in which the pictures are simply superimposed on each other and slightly shaded. For more HDR photos High Quality additionally, various sections of frames are analyzed in order to identify the most successful ones.
HDR mode in the camera of the phone and the camera
When working with the camera, there are two ways to create a high dynamic range photo. The first is more complex, lengthy and is used mainly when shooting professional digital cameras. Its essence is as follows. The photographer takes three to five shots in bracketing mode, and then glues the resulting frames on the computer using Photomatix or another similar program. The resulting image is then optimized for correct display on displays.

But there is an easier way to get an HDR photo. Many modern cameras, including those built into phones, allow you to shoot HDR in automatic mode. The camera does everything for you. She herself sets the desired exposure, she herself performs serial shooting, she glues and processes the received frames herself. In Nikon cameras, for example, you can enable the HDR option in the settings Photo Shooting Menu - HDR - HDR mode - On.

The automatic HDR mode works on the same principle in a smartphone. The phone's built-in camera takes two or three frames and immediately saves them into a single JPEG image. As a rule, HDR in the phone's camera is turned on in its own settings. In some device models, the option is located in the effects subsection, in others, a separate icon is provided for its activation next to the flash. Often, the option to manually adjust the exposure is available in the parameters.
HDR TVs
HDR technology is now supported not only by cameras, but also by some 4K TVs, such as the Vizio P50-C1, Sony XD8005 or Samsung KU7000. The picture in such TVs has more saturated colors, the dark areas look even darker, and the light areas even brighter, thereby achieving greater detail.

However, HDR support on a TV is not at all the same as HDR support on cameras. If in cameras the effect is applied at the moment of creating a photo, then in TV - at the moment of displaying the picture. In fact, this means that in order to obtain the HDR effect, the content itself must initially be supported, which is currently very scarce.
What you need to know when shooting HDR
Using the HDR mode is justified when shooting landscapes, single objects, as well as to obtain detail in low light conditions. It is strongly recommended to use a tripod to avoid shifts and, as a result, inconsistencies in frames when shooting. But for photographing moving objects, HDR shooting is not suitable, as the photos will turn out blurry.
It is preferable to create an HDR photo in the classic way using manual settings and third-party desktop programs, in this case the photo is of better quality. At the same time, if the original images were created in RAW format, tone compression will be required, otherwise on computer monitors HDR photo will look somewhat unnatural.
HDR imaging software
It is important to understand that real HDR photos can only be obtained by merging and processing several frames taken with different exposures, and it does not matter whether the photos are created manually or automatically by the camera of the device. As for creating HDR images from regular JPEGs or even RAW files using programs like Dynamic photo HDR or Photomatix Pro, in this case we can only talk about giving a high dynamic range effect, but not about creating a full-fledged HDR.

You can't create an HDR photo from 8-bit images that you usually deal with on the Internet, just as you can't create it by lightening the shadows and darkening the highlights from a single RAW file. In both cases, the resulting file will be a pseudo HDR image. However, using applications such as EasyHDR, Photomatix Pro, HDR Efex Pro, Adobe Photoshop, Dynamic photo HDR, Corel PaintShop Pro and the like, you can make ordinary images look like HDR, improve color, and bring a surreal effect to them.