We save all the pictures that will be used in the video in a separate folder. In the same folder, download the music for the future video.
When searching for images and music on a computer, we immediately save links to sources.

Download the program for creating videos (slide shows) on your computer. We will work in the program PhotoSHOW Pro.

Install PhotoShow Pro.


Launch the PhotoSHOW Pro program, select the tab New project .


We add photos. Click tab Photo and specify the path to the folder in which all the images and music were saved.

Add photos to slideshow project: Right mouse button - Add all .

Here's what happened:

Change the position of the photo on the screen (tab photo position ).

You can swap photos by dragging the mouse. Set photo change transitions (tab Transitions ) by dragging the desired transition to the box between the desired photos.

Change the project settings (slide show duration, transition duration, etc.). Click Save.

Add music to the project: double-click at the bottom of the project and specify the path to the folder in which we previously put the sound file.


The project is ready. These simple steps allow you to create a slideshow or video using PhotoSHOW Pro.

To create a video file, you need to export the project - create video slideshow.

Choose a video format:


And specify the location to save our video:

Conversion started:

After some time, depending on the amount of photos, the project will be completed. On weak computers at this time it is better not to do anything.

That's all! I wish you creative success! I hope this guide to creating a slideshow or video will help you.
Most fast way creating presentations is the use of ready-made templates in which the optimal background and intervals for changing slides are selected. For this:
Run the program. In the welcome window, click on the "Slideshow in 5 minutes" button.
Select the appropriate template from the list of categories and click Next.

Add photos using the "Add Photo" or "Add Folder" buttons on the right side of the window. In the first case, one image is loaded, in the second case, all photos from the folder are loaded.

Set the photo order using the arrow buttons and click "Next".
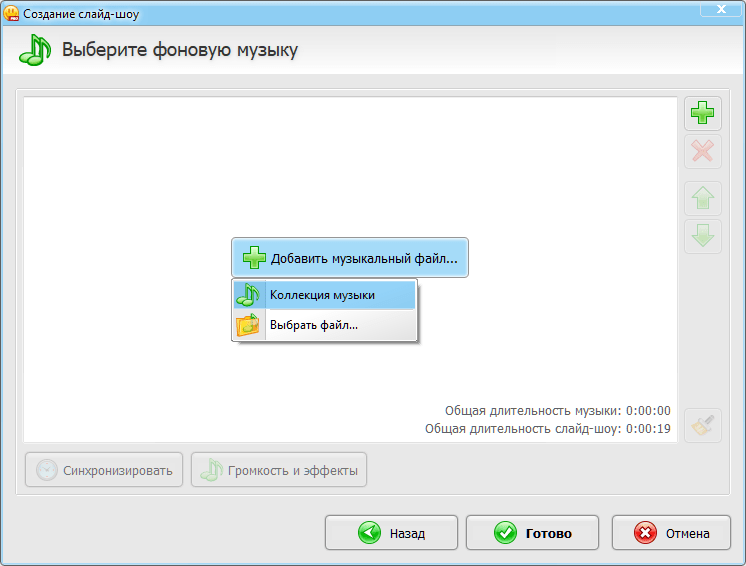
Add a background soundtrack by clicking the "Add Music File" button. A pop-up menu will allow you to select the method of loading an audio track - from the PhotoSHOW pro collection or from a local disk. Click Done.

After that, a window for editing each slide will open.
To change titles, double-click on the slide thumbnail on the timeline at the bottom of the window. Select the text and edit it in the window that opens.


from your favorite photos beautiful pictures and music.
With it, you can create unforgettable slide shows on any topic:
bright postcards with the author's design,
spectacular collages of photos and clipart,
wedding invitation and congratulations.
The program has amazing gradient effects and modern 3D transitions,
built-in set of animated collage templates,
screensavers, titles and special effects,
which will help make your clip even more interesting.
PhotoSHOW Pro can create multilayer animated slideshows,
that is, real photo collages with motion effects.
In this case, any photo can be moved
and rotate in 3D space!
Your projects can be saved on video in a variety of formats:
AVI, MP4, 3GP, MKV, DivX, HD, etc.
You can also create high definition videos
for viewing on a computer and modern TVs.
How to make a movie from photos
see the video tutorial and additionally in my screenshots.
All pictures are enlarged by clicking on them.
1.Select photos or pictures, you can drag with the mouse
.
2. You can apply beautiful animated effects.

3. There are a lot of transitions. Divided into 3 types.
Standard, 3D transitions and gradients, try and experiment.

4.Apply beautiful screensavers.
Everything is edited, your background, clipart, etc. are added.
You can make your own screensaver and save "to my screensavers"
In the windows with pictures added clipart - girls with horses.
Thus, we make collages, while we can move the clipart
and rotate in three-dimensional space, set the trajectory of movement.

5. The program has several options for beautiful blanks with titles.

6. Here are the project settings, choose as you wish.

7. Save in any format you need.

"- a slideshow recording program that can assemble a ready-made video presentation from your photos, drawings or recordings in just a few minutes.
There are several ways to start creating your own slideshow:
- create a project and create a sequence of slides from scratch, setting all the parameters;
- apply ready-made templates in which you can make your changes.
We will start with a simple option - using ready template. When opening the program, select the item "Create a template in five minutes." We decide which of the options for the show you like best.
To make it easier to make a choice, follow the link under each of the templates to see an example of the finished result. Then we upload photos and videos from which we want to make a movie, and start processing the template. After five minutes (or even less if there are few images), we get finished project, in which it remains to enter the name.
How to work with the slide editor
When the project is ready, the main working window of the program opens in front of us. Here we can make changes to the slideshow, exactly according to the same principles, you can create it from scratch. In the lower third of the screen there is a sequence of slides and transitions, using drag-and-drop in this field you can change the position of the slides and adjust the display time, as well as the speed of the transitions.

Basically, it's a long desktop. Imagine that you have printed photographs, paintings or stencils. And you just shift all the objects on the table the way you want.
The program has a large catalog of transitions between slides, from the usual frame change to 3D effects.

Editing an Individual Slide
Each slide has many options to customize. Starting with what size the image or video will be on the screen, and ending with animation and reflection creation. Ready-made collages help you design a slide in a few minutes, insert captions, or add an intro to a slide.

Layers and Keyframes
In order to contain more information on one slide, or to make each element look different, you need to add a layer to the slide. The number of them is not limited, so you can set the background yourself, edit it, add inscriptions, sounds, other photos, and so on.

And to make multiple images interact with each other, set the animation setup to multiple keyframes. On each of the frames, set the image parameters, and everything that happens between key positions, the program will process itself. Each step can be accompanied by a preview to see the result in advance.

Working with sound
You can add sound to slides: upload music or record voice comments right in the editor.

You can work with downloaded files on the desktop of the program. sound track can be cropped, dragged to the desired slide to match the image to the music or speech.
Effects and filters
What self-respecting image editor would refuse filters? So in "PhotoSHOW PRO" there are familiar filters with the ability to customize. For example, you can make an old photo out of an ordinary photo by choosing a good way of “aging”.
You can add animated effects of falling snow, leaf fall or glow to each slide. All effects are also adjustable, up to the angle of the flying leaves and the flickering features of the elements.

Your task when preparing a slide show is not to overdo it. If you are making a presentation to explain engineering solutions, then snowflakes on slides will be out of place. But New Year card with falling snow will set the festive mood.
Saving the result
What do we get as a result of work? The slideshow is saved as a video in the format you need, including DVD and Full HD. For example, if you are going to publish work on social networks or on YouTube, just select the appropriate menu item and save options.

What is PhotoSHOW PRO suitable for?
But the built-in tools are more than enough for presentations, projects, reports that have nothing to do with holidays and recreation.
There are no redundant functions and complicated settings in "PhotoSHOW PRO". Have you ever used the program for specific purposes, do not open some menu items, do not even suspect why they are needed? Here in this program there are no mysterious tabs, just as there are no superfluous ones. All major tasks are solved on the desktop, all the details are honed using the toolbar.
The program will seem naive to the masters of graphic editors, and they will be right. But this is not a tool for specialists, for example, in 3D graphics. The program has one task - to make a professional slide show. "PhotoSHOW PRO" copes with this 100%.
Create spectacular musical films from photos. Vibrant slideshows in three dimensions. And all this is possible even for novice users. Let's take a look at what the PhotoSHOW PRO application is capable of.
Introduction
Photo and video presentations are a real find and salvation for those who want to maximize short time get at your disposal a high-quality and beautiful video. At the same time, you or your relatives and friends can play the main roles in such a mini-movie. After all, all you need to do is select photos and upload them to a special application.
Meet "PhotoSHOW PRO". This is a Russian-language program for creating professional-level presentations. The capabilities of the software will be appreciated by any PC user who decides to create a video from photos. You can try out all the functions of the program right now: just download PhotoSHOW PRO from the official page.
Getting Started with PhotoShowPRO»
Getting started with the program is very easy. The application interface is intuitive, it is easy to work with it even for those users who are just starting to master the intricacies of the PC. Above, as is often the case, the main menu is placed, immediately below it are large tabs, which are the basis of the user interface here. Bookmarks are essentially steps in our slideshow creation process. Moving through them, we gradually perform the necessary operations, which ultimately give us the desired result. Everything is quite simple and concise.

So, launch the software and, using the convenient file and folder browsing built into the application, find the necessary photos on your computer and drag them into the slots at the bottom of the screen. Note that videos can also serve as material for such a presentation, which can be added to the project in a similar way. In this case, you can manually arrange all the files on the timeline, or go the other way and add an entire folder with files at once.
Using pre-made slides
As you can see, each main tab may have additional subsections, which are displayed below, also in the form of tabs. So, adding materials occurs on the additional tab "Photos and Videos". Let's see what the other tabs in the "Add" section are responsible for.
A nice bonus when working with the program will be the ability to use slides from the catalog. Already when adding the first materials to the project, you will notice the tabs on the toolbar " collages», « Credits" and " Screensavers", which presents slides of different topics.
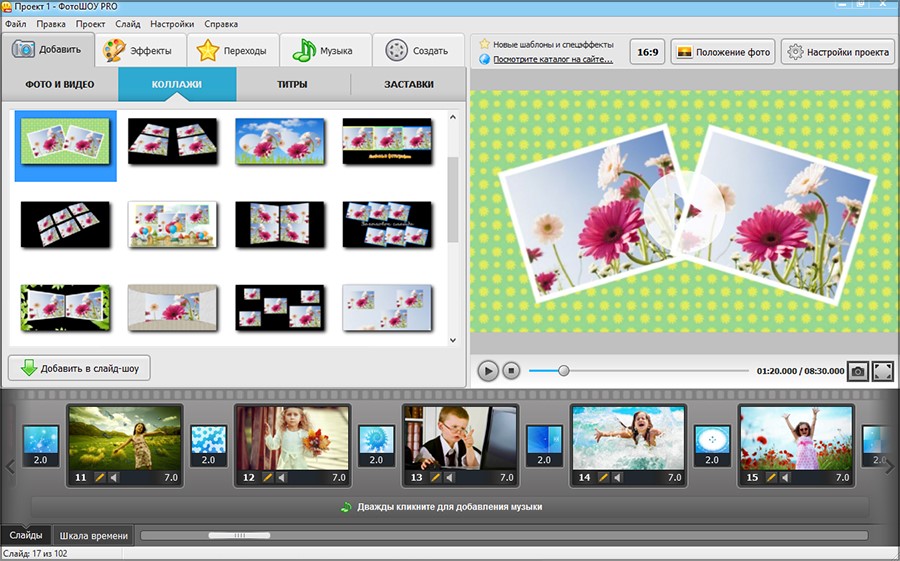
Adding them to the show is as easy as regular photos: just grab the object you like with the mouse and drag it to the right place on the timeline.

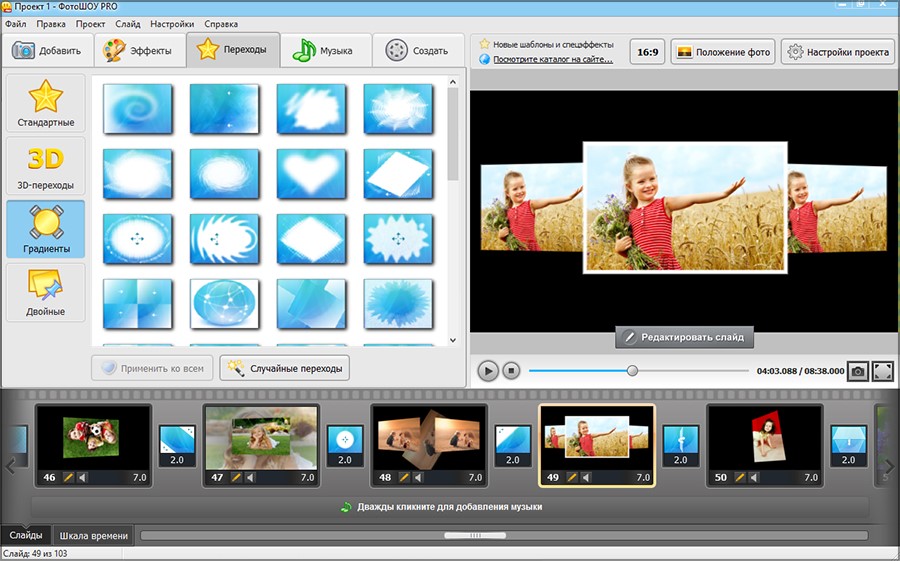
Working with effects and transitions
In the program for creating video presentations, you will find an extensive list of animations that will give your old photos new life. On the second tab effects» collected a variety of animated elements that can make the display more dynamic. All of them are divided into four categories: motion effects, natural, complex and 3D effects.

As for transitions, they are also divided into four groups. In the tab of the same name you will find standard and double transitions, unusual gradient animation and 3D transitions. What to choose? It all depends on your desires and goals!
slide decoration
If you think that only one photo can be placed on one slide - you are very mistaken! And this can be seen very quickly, one has only to open " slide editor».

In the window that appears, upload new photos, gif-animation or videos over the canvas and decorate the slide with clipart from the catalog.
Set up slide animation
Each photo in slide editor» you can assign individual animations and effects that are not found in the standard catalog. Animation in the program editor is divided into two types, which in turn consist of several types.
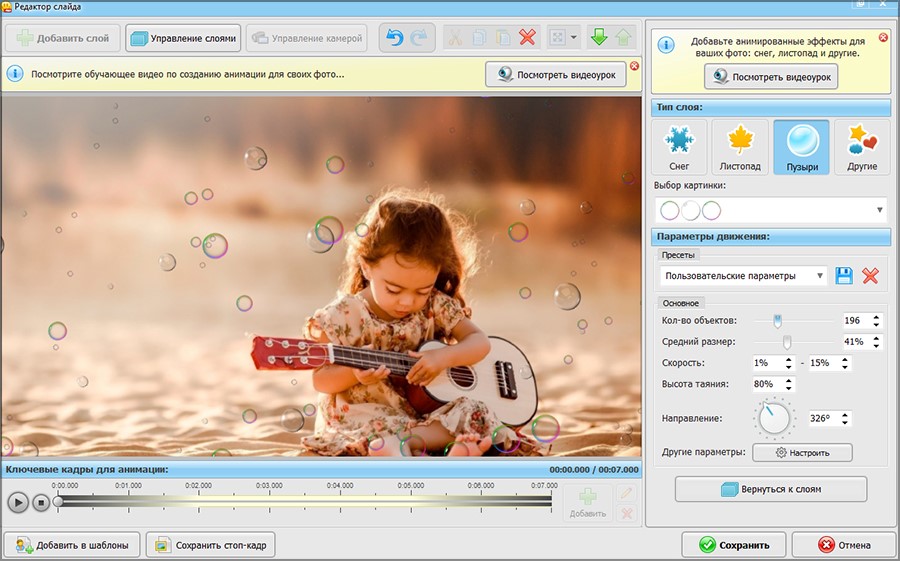
The effects of the first type are all kinds of natural effects, figures, balloons, hearts, doves, clouds and many others. The second type of program for creating presentations from photographs includes various glow effects - flying and flickering objects, sparks, shining figures, and so on. You can apply any of these effects to a slide, and then customize their display: determine the number of elements on the screen, flight speed, direction, etc.
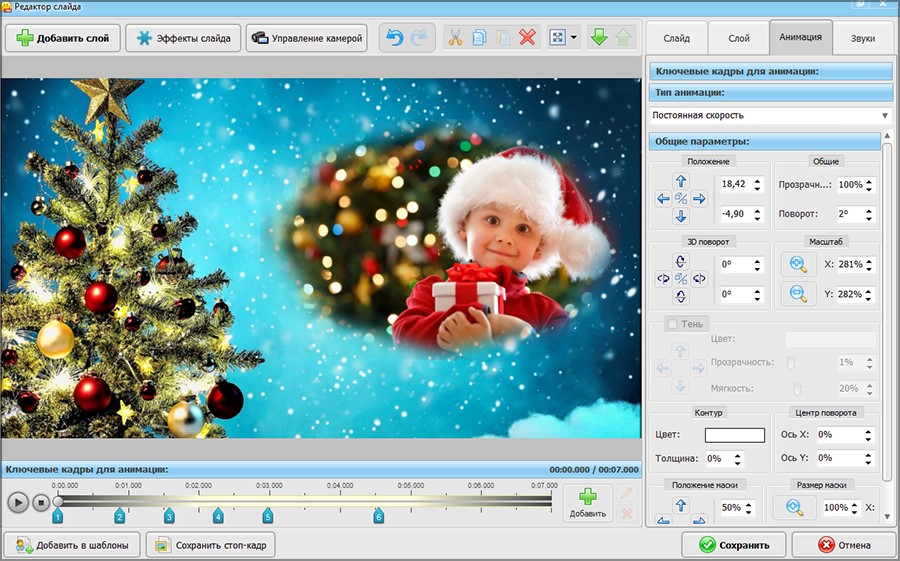
Users who want to personally think through the entire slideshow from start to finish will certainly appreciate the work with keyframes. This feature allows you to customize the animation of each element separately. Thus, you can determine the trajectory of movement of any elements of the slide, adjust the rotations, approach and distance of the object during the show.
Slideshow Voiceover
The slideshow is almost ready, but something is still missing. And that something is sound. Musical accompaniment can also be added in two ways. First, you can sound each frame in the show separately by clicking on the " Sound» in the slide editor. Secondly, you can immediately set up an audio track or comments for the entire presentation by returning to the main menu of the program and clicking the " Music».
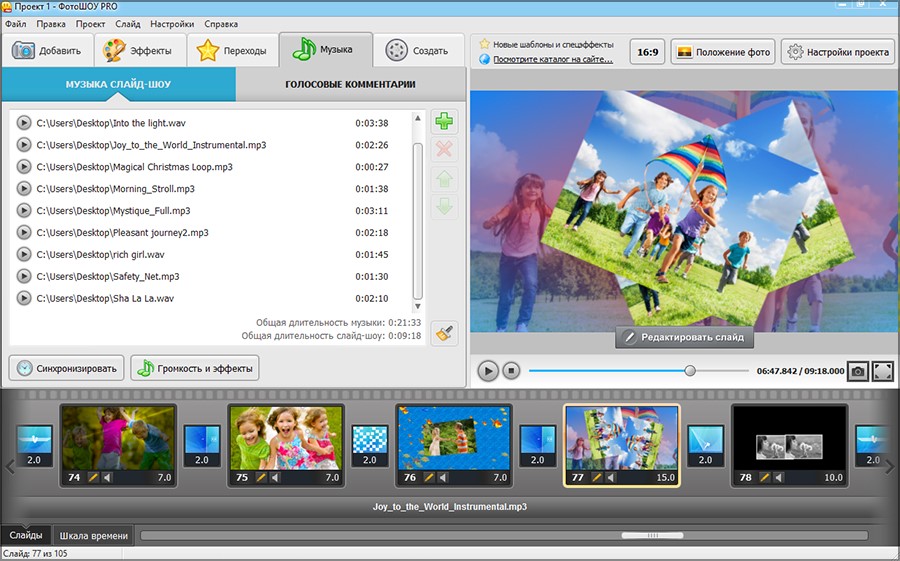
Here you can upload absolutely any melody from your computer to the program, and then adjust its sound and synchronize the music with the show.
Saving a presentation
That's all! It remains only to save the slide show. To do this, click on the " Create» in the main operating menu. A window will open listing all the available options for saving the project. You can create a video slideshow to view from your computer screen or other devices: mobile phones, tablets, players, etc.
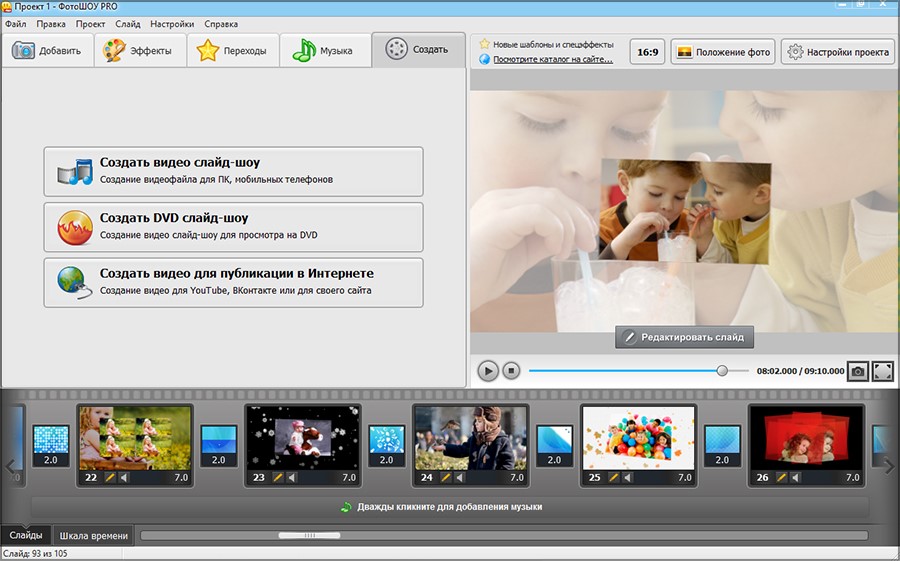
Also, the finished video can be burned to disk, having previously developed a beautiful and original launch menu in the program. The third way to save the presentation will be appreciated by those who like to spend time on the Internet - after all, immediately after saving the program, the program can upload the video to YouTube. In this case, your work will be seen by people from all over the globe.
Conclusion
«PhotoshowPRO» — is a universal program for creating presentations from photos and videos. By adding various effects and transitions, customizing the animation and complementing the show with a thematic melody, you will have at your disposal a high-quality video that can impress even the most skeptical viewer. And that's not all the features of the program! You can learn more about other opportunities right now on the program website.