Now, when cameras are literally packed with the latest electronics, many novice photographers get the impression that the camera itself is able to determine the illumination of the scene being shot, and when overexposure (overexposure) or underexposure (underexposure) appears, there is a feeling that somewhere the camera manufacturer has deceived ...
And this is partly true. I will explain in this article how camera metering works and how to correctly determine the exposure.
There have been plenty of articles written on this topic, so I will try not to describe the well-known at all, but to introduce something new. If anyone has questions on the basics, then you can always ask a question to this topic.
First, let's define terms.
Correct exposure
Exposition in the modern sense- combination of camera sensor sensitivity (ISO), aperture value (F) and shutter speed (T).
What is correct exposure? If to speak plain language, then The correct exposure is the amount of light that you want in the photo. I here avoid the standard definition meaningfully, since it is precisely this that is misleading.
The classic definition is that we want to fit the brightness range of the image into the range of brightness that the photosensitive material, in our case the camera matrix, can accept.
But your picture just doesn’t have to fit into the entire photo latitude of the camera matrix, and you don’t always need details in shadows and highlights. It all depends on your creative idea. What is good for a person who shoots with a “digital camera” is not suitable for a person who shoots with a SLR camera and tries to convey his vision of the world, and not to make photographic documentary shots.
Methods for determining exposure with a SLR camera
normal mode
The light goes through the lens, hits the mirror, is reflected upwards from the mirror, onto the pentaprism, and from it part of the light enters the exposure sensor, and part into the viewfinder. Since there are many obstacles in the path of light rays, the measurement accuracy depends on many parameters, plus it is predicted, and not measured from the final sensor.
For us in this case in terms of measurement accuracy, this method only matters, since this is the only removable element in the path of light rays that go to the sensor and can greatly affect the measurement.
If we use standard focusing screens, this is not a problem - we just select the appropriate settings in the menu and the camera itself makes the correction. If the screen is non-standard (such as the Doden wedge focusing screen for the Canon 5D mark II), then you will have to calculate the exposure compensation experimentally and enter it yourself.
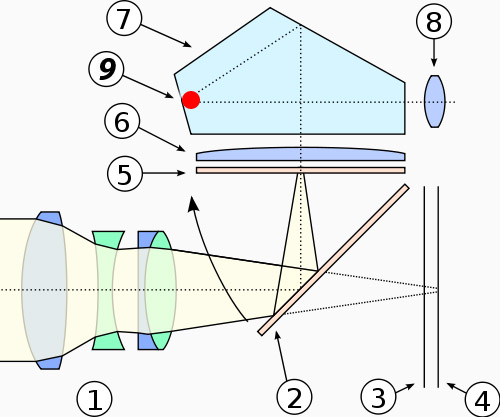
diagram of the passage of light rays to the exposure sensor
1 - lens
2 - mirror
3 - shutter
4 - camera sensor
5 - focusing screen
6 - converging viewfinder lens
7 - pentaprism
8 - viewfinder
9 - exposure meter sensor
liveview mode
The light through the lens immediately enters the camera matrix, according to the image on which the exposure is determined. The same method is used in all mirrorless cameras.
Plus - especially accurate exposure metering, as the camera itself adjusts to the final image. See how the screen on the camera gradually brightens or darkens when you first turn it on. live view.
Minus - the adjustment comes with some delay, since the camera needs some time to process the information taken from the sensor. In medium light, this delay is imperceptible, and with strong changes in brightness, shutter speed numbers at a fixed aperture appear with a slight delay in AV mode.

exposure metering in LiveView mode
9 - metering sensor in normal mode (with the mirror down)
10 - metering sensor in LiveView mode (with mirror up)
Now, I hope you understand why the exposure in live view determined more slowly, but more accurately. For the same reason and focus on live view adjusted more precisely. You adjust the image right on the matrix.
Reflected and incident light metering
There are two types of exposure metering, reflected light and incident light.
reflected light meter
Reflected light exposure is measured by a SLR camera. Light bounces off the subject and enters the lens. There, according to the scenario described above, it reaches the light sensor, the sensor transmits data to the camera, and the camera, in accordance with the firmware, calculates the correct exposure from its point of view.
Incident light meter
The second type of metering is incident light metering. It is especially useful in difficult lighting conditions where the camera cannot cope with either individual elements of the subject or brightness differences. Imagine that you have a model lit from different sides different sources light, and pointwise. To measure the illumination in these small areas, you will have to thoroughly rotate the lens, remembering all the numbers, and then calculate some average exposure to accommodate all the brightness differences.
But the key problem is that all objects have different reflectivity, and the camera does not know with what reflectivity the object is in front of it. It is generally accepted that the average reflectivity of objects in the scene is 18%. And because the camera is trying to bring all your pictures to these 18%. In 80% of cases, the camera turns out to be right, since 18% were taken not from the ceiling, but based on analysis huge amount photoplots. Including European-type human skin is also close to 18% in brightness.
But these remaining subjects, though less common in everyday life (landscape, still life), in portrait photography at every step. Every aspiring portrait photographer soon tries to shoot against a black or white background. And here lies the problem. The camera tries to pull up the black background to 18% light and it turns gray, and the white background, on the contrary, darkens to 18%, and it turns out to be gray too, and the model is underexposed.
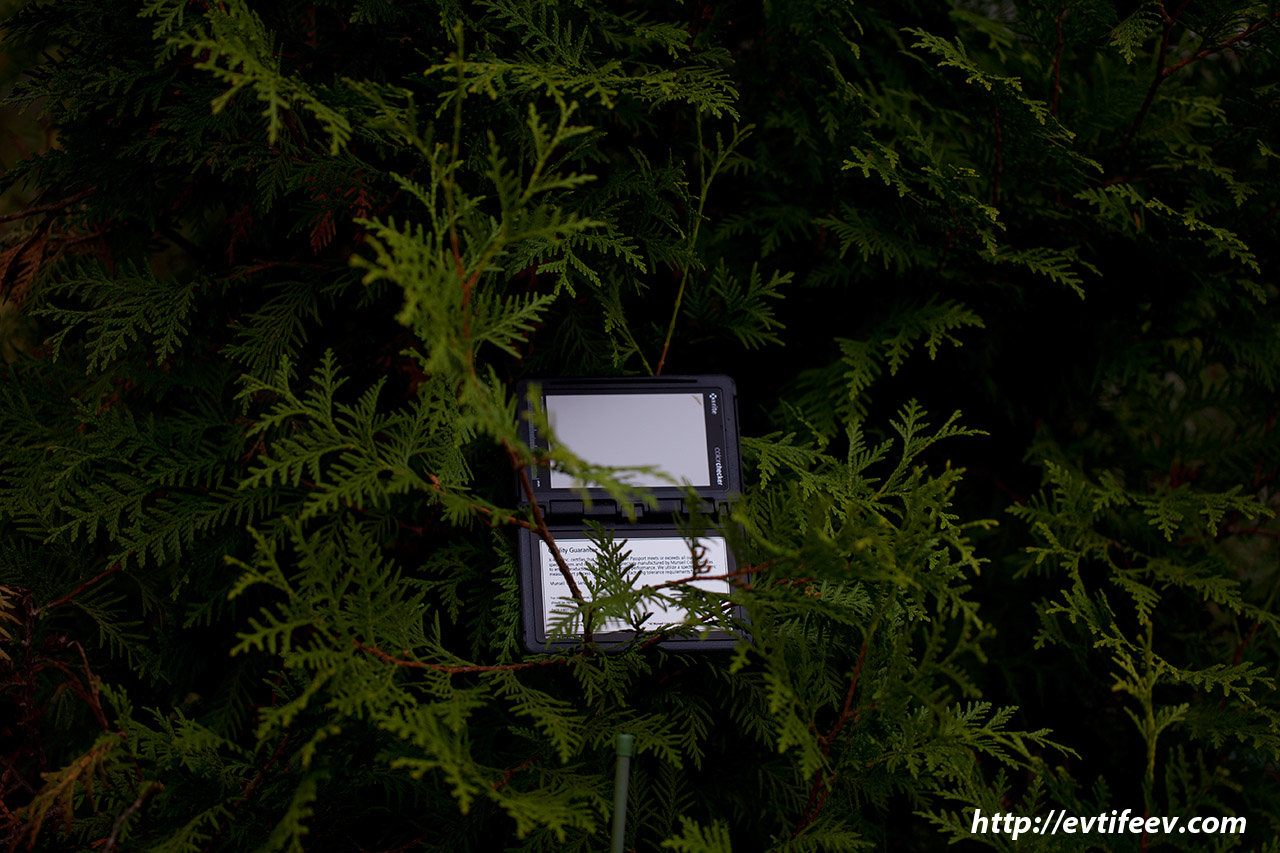
Here is an example. In the foreground I have a photographer's tool - ColorChecker(a set of targets for creating a color profile, I will talk about it in future articles), on which there is a light gray field at the top and a white one at the bottom, but with black inscriptions.
Let's see how such a bright object will be perceived by the automatic camera, which measures the reflected light.

F2.8, 1/30s, iso100
The camera exposure was measured pointwise in the center, but fell on the black frame. The result - the tree in the background (Tuya) has quite good illumination, and ColorChecker everything is overexposed, because the camera measured the correct exposure only for the black frame, pulling up its illumination to medium.
The tree brightened for the company.
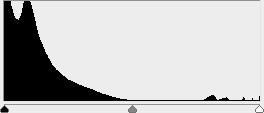
The brightness histogram of this image is as follows. 
The histogram shows us how everything miraculously became medium gray (a large, even mountain in the center) and on the right we have a little notice that a small part of the frame is overexposed. In general, this can not be noticed on the tiny screen of the camera. For this reason, turn on the blinking overexposure indication in the camera.
Now I will measure the illumination of the gray card ColorChecker also pointwise. The point is that the Xrite ColorChecker the gray scale is not 18%, but much lighter (59%).
Notice how the camera's opinion of the correct exposure has changed even though the scene lighting hasn't changed.
F2.8, 1/250s, ISO100
Now it's all too dark.

The brightness histogram shows underexposure. Here's that little "grass patch" on the histogram that's about in the middle - information about our main subject - color checker"e.
Let's try the automation. Will the camera be able to guess the correct illumination in the maximum automatic modes?
We use evaluative metering, which analyzes the entire image and is recommended by Canon for portraits and backlit (backlit) subjects.

F2.8, 1/80s, ISO100
As you can see, the tree was exposed normally, but our object is color checker, overexposed.
In this case, the portrait would have turned out a little brighter than necessary, for the reason that the subject is darker than the average gray in general.

Notice how little information we get from the histogram about our main subject. Those are the two little teeth on the graph on the right. The first tooth is a gray card, the second tooth is white, with overexposure.
After all, the camera does not know what exactly we are filming and assumes that we are filming what occupies a larger area of the frame. A large area is occupied by a tree. Here she will work on the correct exposure of the tree.
Another automatic mode is partial metering. It uses about 8% of the frame in the center of the viewfinder to calculate. Recommended when the background is much brighter than the subject. This is not our case, but still try.


F2.8, 1/160s, iso100
It turned out already very close to the truth, but a little dark.
Here the information about the tree takes up the left half of the frame, and about our subject - a few teeth closer to the right edge. Nevertheless, it is clear from the histogram that despite the underexposed tree (in our case, this is the correct exposure, it can be seen with the eyes too!), ColorChecker correctly exposed.
Now we put a real 18% gray card and measure it.

F2.8, 1/160s, iso100
The map was slightly unevenly lit, but overall the exposure is correct and similar to what I see with my eyes.
Those. which was to be confirmed - medium gray scenes are perceived by the camera well and the exposure is generally measured correctly.

Pay attention to how the histogram of the brightness of the image looks “wrong”. Firstly, the histogram does not take up the entire range of brightnesses, and some will want to stretch it over the entire range. But where do you see white objects in the picture?
The tree is black to medium gray in brightness. The gray card is dark grey.
Think about the fact that in most cases our task is to convey the illumination of the place as it is, and not to artificially pull out those brightnesses that are not visible to our eyes.
And how will the metering based on the incident light behave?

exposure meter Sekonic 758D(the model is unprincipled) measured us with an aperture of F2.8 and ISO 100, a shutter speed of 1/125s.
Instructions for Sekonic 758D in English below
Please note that the light meter of the soap dish I used to shoot this shot (with the light meter in the picture) also distorted everything.

F2.8, 1/125s, ISO100
Incident light exposure metering was very accurate in this case.

Here you can see that we managed to shove in the "non-pushed". We have saved the maximum information about the tree and even our color checker all fell into the range of brightness, without overexposure. This is the ideal option.
Of course, it has its limitations, and the main thing is that it is not always possible to bring the exposure meter to the subject and there is not always enough time for this. But having it with you is quite justified, as it can help out in many difficult situations in terms of exposure metering. Plus, many exposure meters are equipped with spotmeters, i.e. reflected light meters. Using them is as convenient as measuring a camera, but it allows you to leave the camera on a tripod, aimed at the scene, and take measurements with a specially designed device (convenient when shooting landscapes).

exposure meter spotmeter

exposure meter as a spotmeter
If necessary, exposure compensation can be entered permanently into the exposure meter. It can also be calibrated to a different reflectivity (default 12.5%).
Modern exposure meters allow you to remember the last measurements and, with the press of a button, give out the average exposure value at which you will fit the maximum of the measured brightness range.
You can also build camera profiles and enter them into a modern exposure meter, like Sekonic, thanks to which you will immediately see if the range of brightness of the scene fits into the dynamic range of the matrix of your camera.

You can list for a long time ... I advise you not to listen to skeptics, but to try at least the simplest.
In addition, models of exposure meters capable of measuring pulsed light are called flashmeters, and they cannot be replaced at all when working with studio equipment.
Remember that the measurement of reflected light through the lens is also affected by how accurately you focus on your lens and the type of your !
And if you still decide to use only the camera's exposure metering, then I recommend remembering the useful button for fixing exposure metering.

Imagine a situation where you have a bright sky and a dark earth. You don’t have any devices (filters) to equalize the illumination. Let's forget about bracketing for a while. You want to miss out on a minimum of image detail. You aim the lens at the sky, press the shutter button halfway. The camera will then measure the exposure. The sky will be correctly exposed, and the ground will go into darkness. By holding the shutter button halfway down, you press this star button (it's not in vain so well located). The exposure meter is fixed. Now you can release the shutter button and calmly adjust the composition of the shot.
Why did we measure the exposure by the sky? The fact is that the details of the image are lost at different rates when the image is overexposed and underexposed. When overexposure, they are lost much faster. Therefore, it is always better to underexpose - then you can pull out more details from the shadows than if you overexpose and try to bring details from the overexposed area.
A little about the correct exposure and brightness histogram
At first, I didn’t want to talk about the histogram, since everyone, it seems to me, already knows how to use it, but the topic seems to be insufficiently covered without mentioning this method, including its pros and cons.
The advantages of the histogram are mainly related to medium-gray plots (a flat slide in the middle of the scale). For example, such a plot can be photography in cloudy weather. But as soon as you find yourself in the evening twilight or in the bright sun with shiny objects, it begins ...
The histogram wanders left and right and does not provide any information about the correct exposure. Here, the camera automation will not help and you will also have to use your intelligence. Look for medium gray items that can be about as reflective as an 18% gray card. It can be gray asphalt and a gray wall of the house. It's good to have a gray card with you, but it's inconvenient because it gets wrinkled easily. Instead of a gray card, you can take a piece of a gray studio background, you don’t feel sorry for it and it folds up as you like. After measuring the exposure of the scene, I recommend fixing the values \u200b\u200bof the button described above and use them until you switch to other lighting conditions. Let's say some plus or minus in the illumination, which is pulled out in the RAW converter.
If there are peaks on the histogram, then there is quite a lot of information in these brightness values (by frame area).


So, the big peak on the right in the brightness histogram is the gray map that I put in the frame. It occupies a little more than a third of the frame in the picture, which is quite a lot in area.
Spruce needles are darker and therefore are located in two left, smaller peaks. These peaks are smaller in height, since the bright spots of spruce needles do not occupy so much in the area of the image. On the left side, the histogram goes to the end, which means there is a black color in the picture, and on the right it breaks off before reaching the edge, which means there is no white in the picture.
Based on such simple reasoning, you can analyze the image from the histogram.
But, as you can see, we have no information about the overall brightness of the scene if there is no gray card or its substitute in the frame.
If there are questions - ask. While I'm on my way to write about...
Many amateur photographers, not wanting to waste time and energy on mastering tedious and multi-letter topics in photography, remain laymen in the matter of exposure metering modes. And beginners and camera users are often completely unaware of the existence of this topic. No wonder, because soap dishes do not allow the user to control this process, carrying it out automatically. But having started using semi-or, it is important to understand this. Therefore, now we will consider how the technique does this and what exposure metering modes the camera has.
Who is this camera metering
Exposure is one of the fundamental criteria for the quality of the resulting image. In essence, this is the amount of light that will be captured by the camera in your photo. There are formations of this amount of light - , and . But these are factors that affect the control of light transmission on. But before falling into the "paws" of these three guys, the light is formed on the subjects themselves and measured by the camera's built-in light meter. The process of measuring the amount of light from a certain area of the frame with a built-in exposure meter is called exposure metering.
Built-in exposure meter
 In the old days, when shooting was carried out in manual mode, every photographer knew what a light meter was and knew how to work with it. In modern times, this miracle device is built into any photo and video equipment and can work without our intervention. Due to which the camera can work in fully automatic mode. The main and only task of the exposure meter is to measure the amount of light at specific points in the frame. This task is also performed by the built-in exposure meter of the camera, with only one “but” - it measures not the reference incident light, but the light reflected from the object. Therefore, it is easy to mislead him.
Different objects have different degrees of light reflectance, and the built-in exposure meter perceives all objects in the same way (neutral gray), since it is just a technique and cannot know what exactly the lens is pointing at now. Snow is one such popular trickster. Which, due to the high reflectivity of light, makes the technician think that it is much brighter than it actually is. As a result, remains. Therefore, to help the exposure meter, there are adjustments by which we help the camera decide which area to take a “sample” from to build the exposure.
Exposure metering modes
 On the this moment There are several different camera exposure metering modes:
- average exposure metering (obsolete);
- matrix (evaluative, multizone) exposure metering;
- center-weighted (center-weighted average) exposure metering;
- partial exposure metering;
- spot metering exposure;
- froze in bright areas.
Average exposure metering
Also sometimes called "integral". I took into account the brightness of the entire frame equally. Suitable for low contrast scenes. Therefore gave common mistakes in exposure when shooting high-contrast shots, such as a photo taken against a bright sky. Further refined by camera manufacturers. So, some brands have adjusted the system to allow exposure metering with priority on the bottom of the frame and called it “auto contrast compensation”. Now considered obsolete and no longer used in modern cameras.
Matrix Metering
 The camera measures light from all sensors throughout the frame. What makes this exposure mode the easiest to use, convenient for beginners and those who do not want to bother with zone measurements. Modern cameras manage to take quite decent shots in this exposure calculation mode. Except for high contrast scenes. If there is an object in the frame, for example, with room lighting and light from the window, then the camera, trying to balance the lighting, may produce unpredictable results. In such scenes, she needs help and uses more spot metering modes.
Center-weighted Average Metering
 Also called "center-weighted average", for example, in Canon brand. Takes data from a large area in the center of the frame, and when processed, the central part of the zone dominates. This option of measuring the exposure of light data from film cameras has migrated and is now not the most popular. There are several reasons for this. It is also easy to use, like the matrix. But at the same time, it is something in between the above - a matrix rendering of the exposure and a point one, which will be discussed below. As a result, a fairly intelligent matrix mode is easier and more convenient to use for beginners, and a dot one, although more complex, is better, performs its task more accurately and is preferable for pros.
Partial Metering Mode
 The mode is similar in its methodology to center-weighted, but has a smaller coverage, about 15% from the center point of the frame. It is convenient when the subject and the background of the frame contrast strongly with each other - when the background is much darker or, on the contrary, much lighter than the object in the center. That is, it is again transition mode, which fills the void between matrix and spot metering modes. Also not very popular.
Spot metering
 One of the most difficult and at the same time favorite and accurate modes for professionals, especially for lovers of portrait or subject photography. It is complicated by the fact that you yourself indicate to the camera from which specific point of the frame it should start in building the exposure. In this case, you need to be careful and think about the choice of the point. Specify too bright, get an underexposed image. Specify a very dark - get overexposed. Therefore, this mode is considered professional, since you need to understand the principle of exposure formation and indicate the point to the camera with this understanding.
But it opens up a huge potential for creative ideas. In your hands there is the possibility of creating high-contrast in a dark room and, for example, with a face partially immersed in shadow. Or trees in the forest pierced through the foliage sunbeams. Or a model against the background of a window with backlight hitting the camera lens. And taking into account the possibility of blocking exposure metering (discussed below), it is possible to further expand the boundaries of fantasy and taking measurements from the backlight that hits from the window, continue composing the frame and focusing on the model, create a black silhouette against the background of a bright window.
In general, the possibilities are huge, just invent and implement. But there are moments in which the point mode will not work. For example, a general portrait, a flock of animals. All options where the subjects are located at a distance from the selected point and may be illuminated differently. In such cases, modes with a larger sensor coverage area are better suited - matrix, center-weighted, partial.
Highlight metering
 One of the newest exposure metering modes. It began its existence in cameras from the Nikon brand (D750, D810). Designed for photographers working with RAW format. As you know, overexposed areas of the frame are a headache for the photographer and sadness for the eyes of the viewer. After all, overexposure, unlike shadows, is impossible or almost impossible to revive by returning detail to them. Strong overexposure often remains a white burnt spot in the photograph. Highlight metering mode is designed to eliminate the possibility of this phenomenon. Focusing on the lightest areas of the frame, he builds the composition so that in the extreme case the frame is underexposed (darkish). In this case, as mentioned earlier, the calculation is that the image will be saved in raw RAW format and will be further processed in a photo editor. Since the raw RAW format, unlike the compressed JPEG, allows much more flexible manipulation of light and shadows. Due to which underexposed (dark) areas of the image will be stretched.
Metering lock mode
 It is worth highlighting the capabilities of the camera for temporary blocking of exposure metering. Almost all modern semi- and professional equipment has such a function. It is achieved in two ways with some differences.
- The first option, in pre-focus mode (half-pressed shutter button). At this point, exposure and focus are metered and await your final decision. Which you can use to recompose the shot (change the subject) and complete the full press of the shutter. In this case, previously measured and recorded data are applied to the newly selected object;
- The second option is a separate button on the carcass (body) AE-L (Automatic Exposure Lock), which performs the same function, but without touching the focus and without half-pressing the shutter release. That is, by aiming at a subject with the desired lighting and pressing this button, there is some time to recompose the frame and focus on the new subject. Note that depending on the manufacturer, the (AF-L) (Automatic Focus Lock) function can also be assigned to this function. Which completely repeats the pre-focus mode. But in this case, the operating modes of this button can be configured in the camera settings.
What's the point? Often used for point and partial measurements. When you take a light test not from the whole frame, but from a specific point in the frame or part of it. This gives you unlimited possibilities for being creative with light.
As you can understand, each option for measuring exposure with a camera has its own irrefutable advantages and disadvantages. If you do not want to suffer with zone exposure modes, which require deeper knowledge and understanding of the issue, then your option is matrix. But remember, in scenes with backlight (bright light hitting the camera lens) and in high contrast scenes, the results will most often not be satisfactory. Many people like to use spot metering because the results are fairly predictable and under your control. But then you will need to use either the pre-focus function or the metering lock button. Or constantly, from frame to frame, run the point of choice of the exposure meter sensor in the frame. For owners of cameras with a new exposure metering mode for bright areas and who do not disdain further processing of the RAW file in a photo editor, oddly enough, the “highlights metering mode” is a priority :). That is, to each his own - a matter of taste. Whoever likes what type of measurement is taken into service.
In order for the camera to determine the right settings for shooting, first of all it needs to know how bright or dim the lighting is in the space that you want to photograph. The exposure meter in the camera is responsible for this determination. Needed for the picture is one of key tasks any camera automation.
All Nikon CZKs use reflected light metering, the so-called TTL mode. TTL means 'Through The Lens' - through the lens (lens), that is, the metering is calculated using the light that was reflected from the object being shot, passed through the lens (lens) and hit the exposure meter sensor.

- The metering point is the same as the focus point when single-point focusing is used. By moving the focus point in this mode, you can see how the exposure meters change.
- The metering point for spot metering is always in the center of the frame when using (rectangle icon) or any method other than single-point focusing.
- Dot mode does not work TTL+BL with Nikon SB flashes.

Exposure metering is center-weighted.
In Live View mode, exposure metering works exactly the same, only information about brightness and color distribution is taken directly from the camera's sensor.

Exposure change when different metering methods are selected. Spot metering made the watch correctly exposed, but the total exposure fell into the '+'
Personal experience:
Roughly speaking, accurate exposure metering algorithms each chamber is different, since each camera uses its own exposure metering module and its own matrix, which has different DD and ISO values \u200b\u200band a number of additional settings for the . The operation of the exposure meter of each individual camera has to get used to. If the on-camera exposure meter for reflected light does not suit you, you can always buy an exposure meter for illumination. Personally, I just roughly know how the camera behaves in different conditions.

I take almost all the pictures in the matrix mode with , when the conditions are very difficult, I use spot metering, and when the automation does not suit me, I simply use the manual camera control mode, in which I set the exposure parameters by eye or by the histogram. In automatic modes, it is very useful to use . Even if I didn’t keep track of the desired exposure on the camera’s display, I can always correct the levels when processing the RAW file. Metering is especially difficult when shooting with multiple flashes in i-TTL mode, in which case I still use matrix metering, but manual flash control with .
In general, the same can be said not only about Nikon, but also about other systems.

Auto exposure metering works quite well
conclusions
Understanding exposure metering is the foundation for a properly exposed photograph. If a learn to manage with different metering modes, you can easily shoot in any situation with difficult lighting. I advise you to conduct your own experiments on your CZK.
Help the project. Thank you for your attention. Arkady Shapoval.
Getting the right exposure is very important to create a quality photo. Cameras are capable of measuring exposure using various algorithms. It is important to know which type of metering is best for which situation. Let's talk about this now.
To make a picture the same as you saw with your own eyes, you will have to make HDR from several photos. The fact is that the human brain is able to perceive a large amount of information and process everything in such a way that a contrasting picture with a lot of details in shadows and lights is imprinted in our minds. Cameras can't do that. In the picture, you have to choose in which area there should be more details, in light or dark.
Modern cameras are equipped with dynamic range extension functions. In the case of Canon, this is Auto Lighting, with Nikon it is called D-Lighting. The most accurate measurement is performed by the Estimated or Multizone algorithm. The camera receives information about illumination from the entire area of the frame and, based on this data, tries to build the correct exposure. The algorithm divides the frame into many parts and each part is analyzed separately. Then all the data are compared and the average value is displayed. The number of zones depends on the quality of the camera.
To quickly correct the exposure, making the frame darker or lighter, there is a function such as exposure compensation. It is referred to as +/- EV. Center-weighted metering analyzes the center of the frame. Information about the brightness of the scene from the edges of the frame is not taken into account. Spot metering analyzes a small area in the middle of the frame. In this mode, a small shift of the camera to an area with different illumination can lead to a drastic change in the exposure of the entire frame.
Manual regulation

Not many cameras offer more than two stops of exposure compensation. If you switch to manual mode "M", you can adjust the brightness of the frame as you like.


A very useful feature is exposure bracketing. The camera will take a series of shots, each with different settings. In this way, you can take pictures for later merging into HDR, or simply to select the most successful frame.
How metering modes work
Estimated (matrix)

The camera can adjust the exposure according to the brightest areas. This will likely corrupt the image. You have to be careful with this mode. Additional frames from a different angle will make it more likely to get high-quality pictures.
center weighted

This type of metering is best for creating contrasting scenes. The central part of the photo will come out with a good, correct exposure, and there will be contrasting light or dark areas around the edges.
dotted

It is very difficult to adjust the exposure of the entire frame by one point. This is not always possible. It all depends on the scene. It is best to work with multiple points.
How to get the most out of exposure?

Blackout
To get more saturated colors, deep vibrant skies and good contrast, it is worth underexposing the frame a little. The picture will be darker and more dramatic. During processing, you can increase the brightness of individual areas, but the image will initially be contrasty and saturated.
Lightening
Bright photographs create a feeling of lightness and flight. These are romantic feelings. This works for both portraits and landscapes.
Constant control
View the pictures you have taken on the camera screen from time to time. Use a histogram. It will show if you are taking too dark or too light shots. View pictures with magnification. On a small screen, it is difficult to see the details without zooming the picture.
Exposure metering is a function in the camera responsible for measuring the amount of light entering the camera sensor and allowing you to correctly determine the exposure (, ). All modern professional cameras have a built-in exposure meter, shaped like a small sensor. There are also external exposure meters, but in this article I will describe the basic concept of exposure metering with the participation of the built-in sensor. In the process of wedding photography, changing metering modes can sometimes be very difficult, given the speed of events taking place at the wedding. However, this is one of the basic concepts in the theory of photography and therefore it is necessary to understand what exposure metering is and the difference between its main modes.
The light entering the camera is divided into two types: reflected and incident. The built-in exposure meter is guided by the information coming from the reflected light.

exposure modes.
For the correct exposure of the frame, taking into account different lighting conditions, the cameras have several exposure metering modes.
- Matrix
- Center-weighted
- Spot


Matrix metering.
The operation of this mode is based on the following principle. The frame is divided into numerous zones (depending on the camera manufacturer, there are a different number of them) and each of them is separately analyzed for brightness and dark / light areas. The metering also takes into account the focus point, colors and distance from the camera to the subject/subject. This mode was first introduced by Nikon in 1983 in the Nikon FA. Currently, in Nikon cameras, metering sensors are equipped with zones close to a thousand in number. Matrix metering is the default on most cameras. This is the most commonly used type of metering and is best used in evenly lit conditions.
During the creation of the following photos, only the metering mode of the exposure metering changed, all others remained the same.


Center-weighted metering.
There are situations when it is necessary to measure the illumination of only a part of the frame, for example, when taking a photo portrait with the sun in the background, or under conditions of contrasting lighting during outdoor photography. In this case, center-weighted metering will give the most accurate results. In this mode, only the central part of the frame is measured and, unlike the matrix mode, the focus point does not affect the final result, since the metering takes place clearly in the central part of the frame.


Spot metering.
This type of metering uses only a small area of the image in the very center of the frame to determine the exposure. Approximately metering occurs 1 - 5% of the total frame area. Spot metering is best used when the main subject is bright and the rest of the frame is dark. Good example, the moon against the dark sky.
The metering mode switch in many professional cameras is located on the camera body.


Perhaps at first the information described in this article will seem difficult to use. Do not worry! Remember that theory is best consolidated in practice, and the more it is, the better. I wish you good luck in mastering new high art photography.